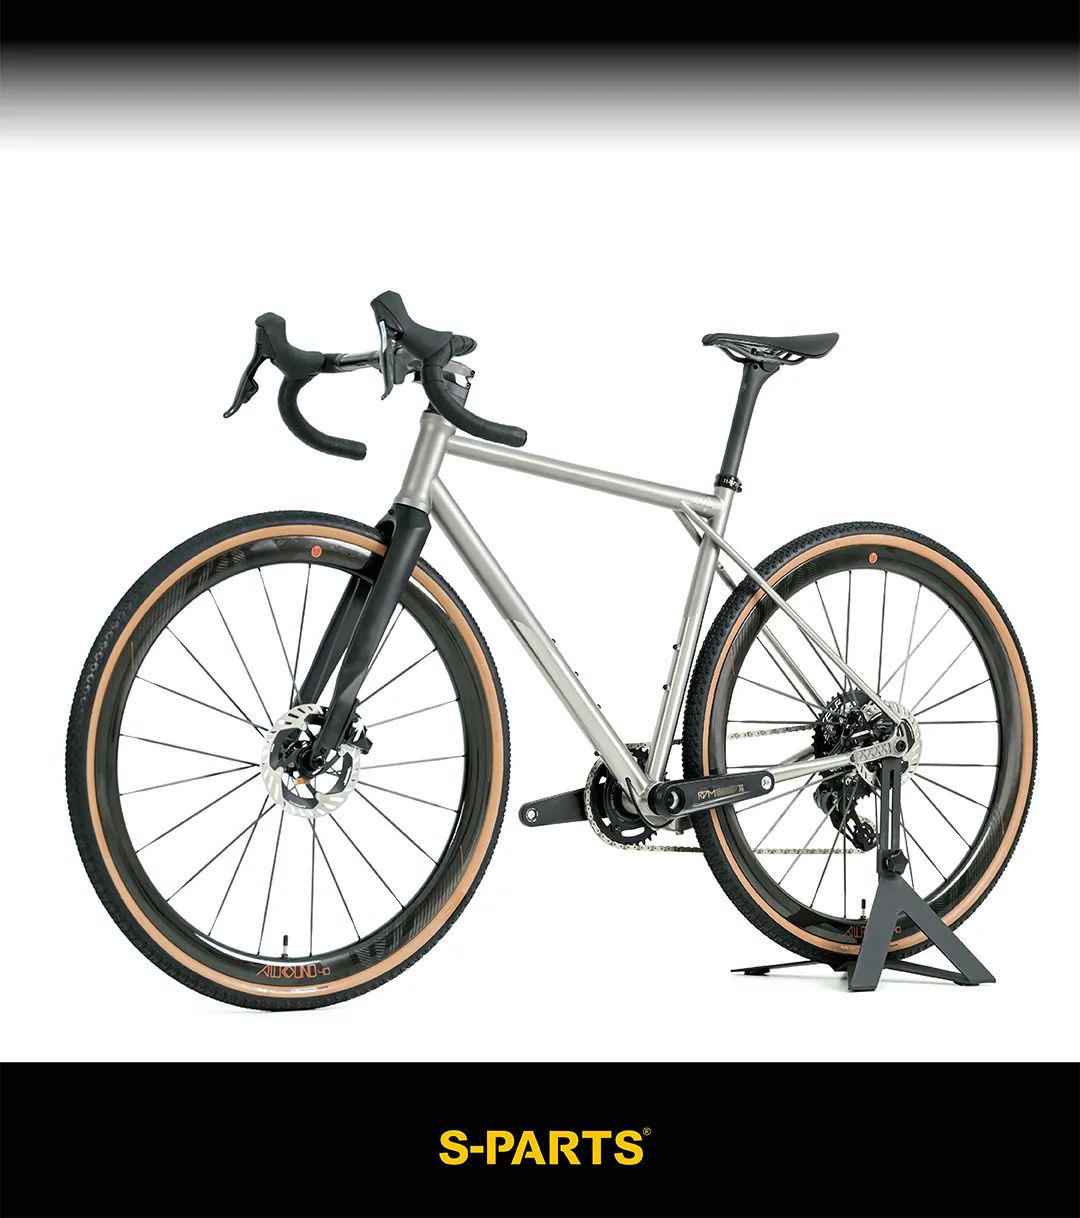
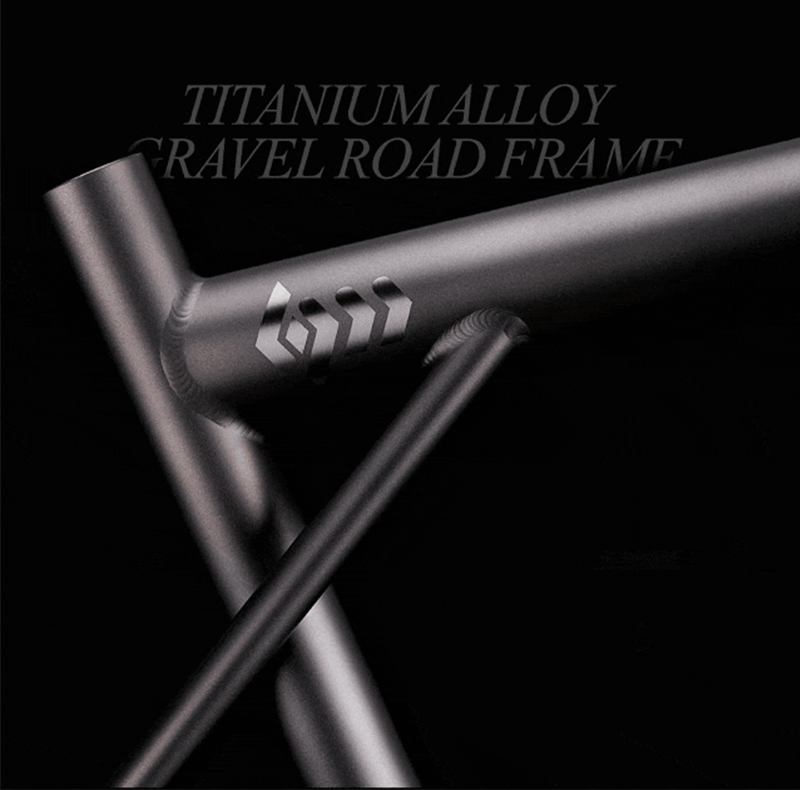
S-PARTS Titanium Alloy Gravel Bike Frame

WHY GRAVLE?
At the inception of designing the first mass-produced titanium alloy bike frame for S-PARTS, we contemplated two questions:
- What type of bicycle is best suited for titanium alloy construction?
- What kind of riding experience and lifestyle should an exceptional titanium alloy bicycle provide?
[Choose, Think, Create]
Titanium's inherent mechanical properties provide a perfect balance between torsional rigidity and vertical damping. It ensures the lateral stiffness needed for high power output during pedaling while absorbing vertical bumps from various complex terrains and filtering high-frequency vibrations. This makes it not only suitable for paved roads but also destined to break free from urban constraints and race through the wild. Whether it's short sprints or long journeys, these are its specialties. This reliable titanium alloy companion is always ready to join you on an adventure, embracing the mountains and rivers that await.
That's why "Gravel" is the most beautiful interpretation of a titanium bike.

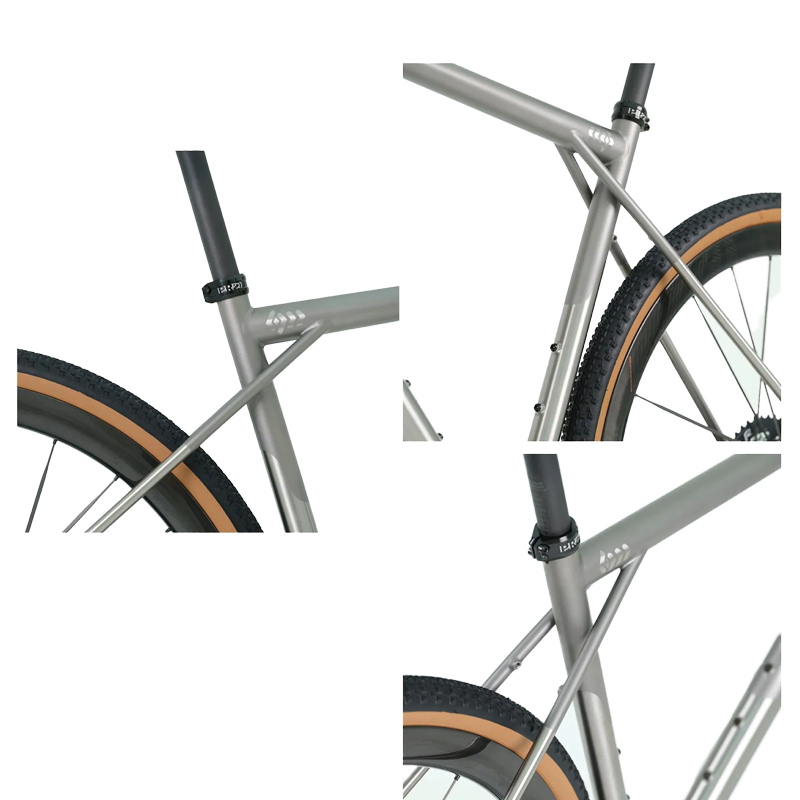
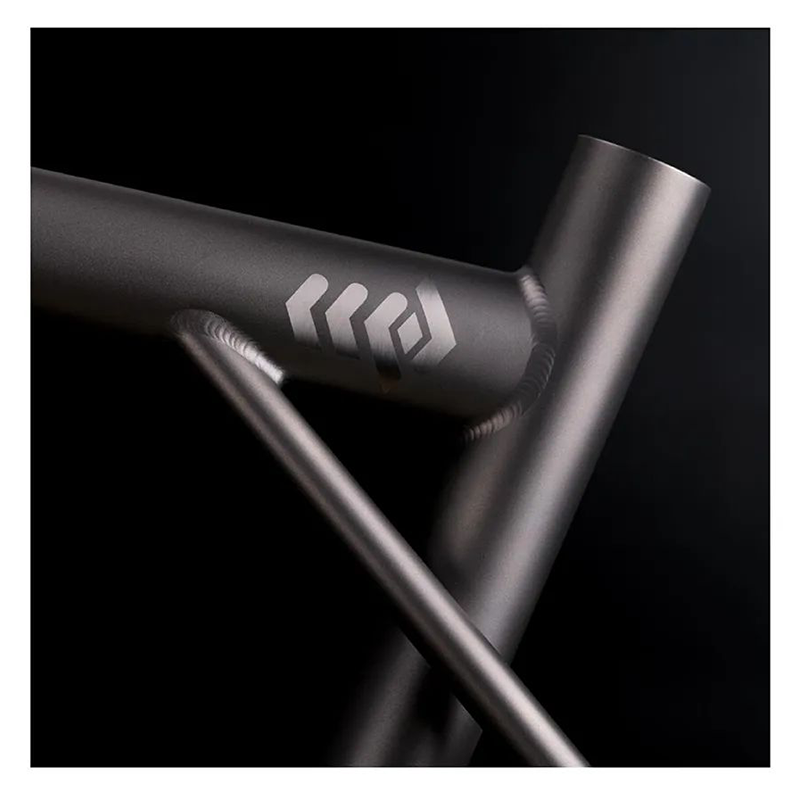
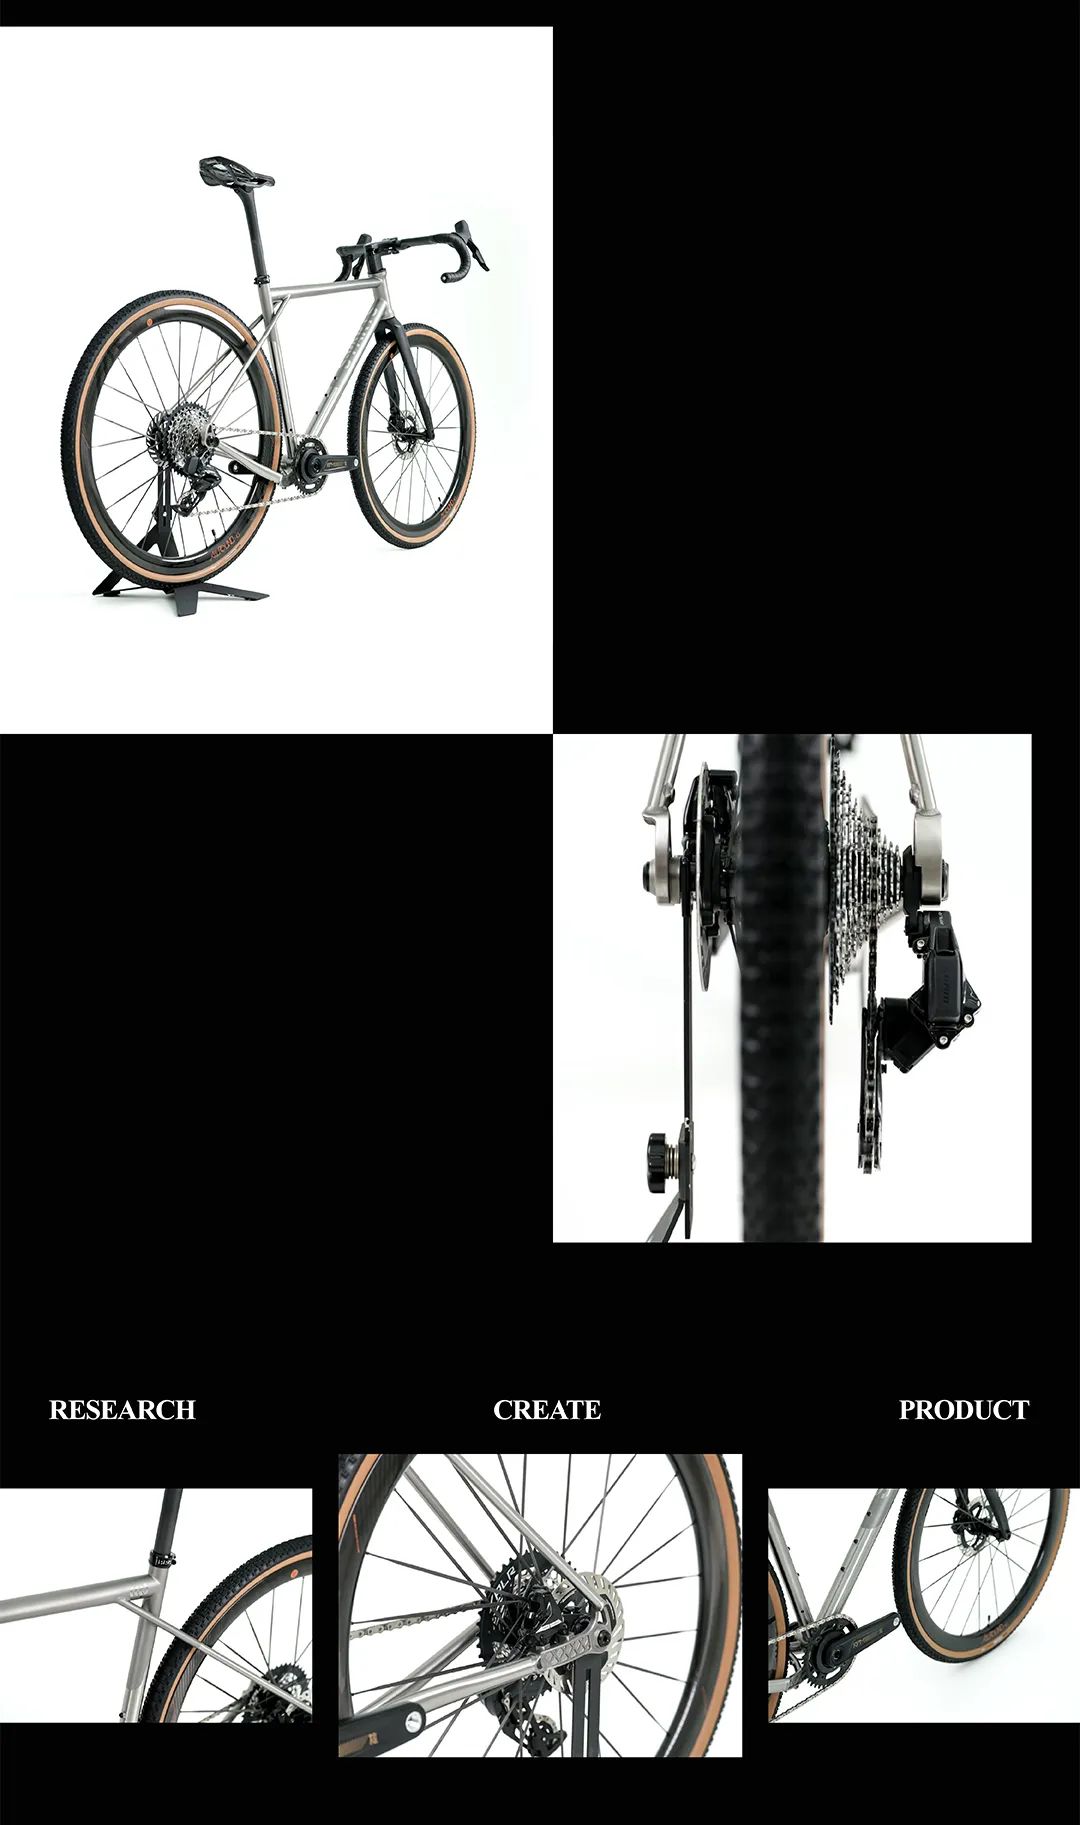
CROSS CONTROL SYSTEM 2.0
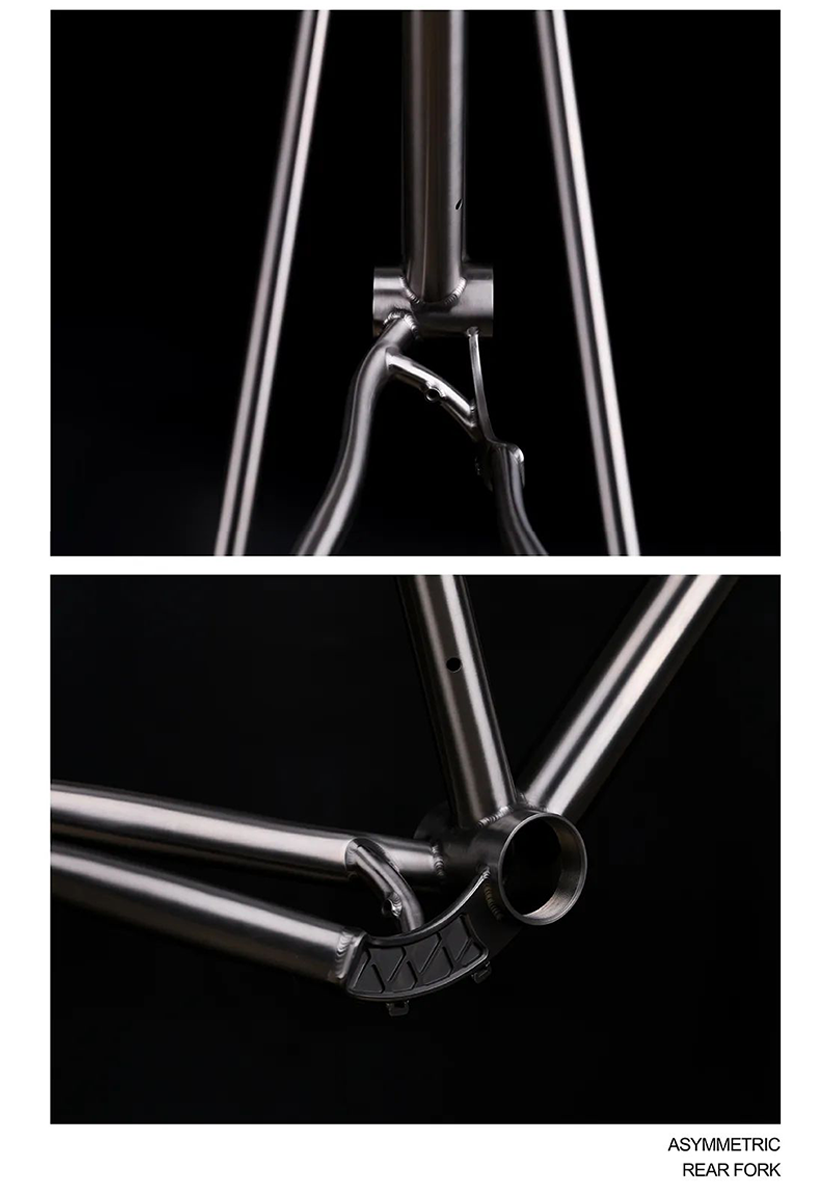
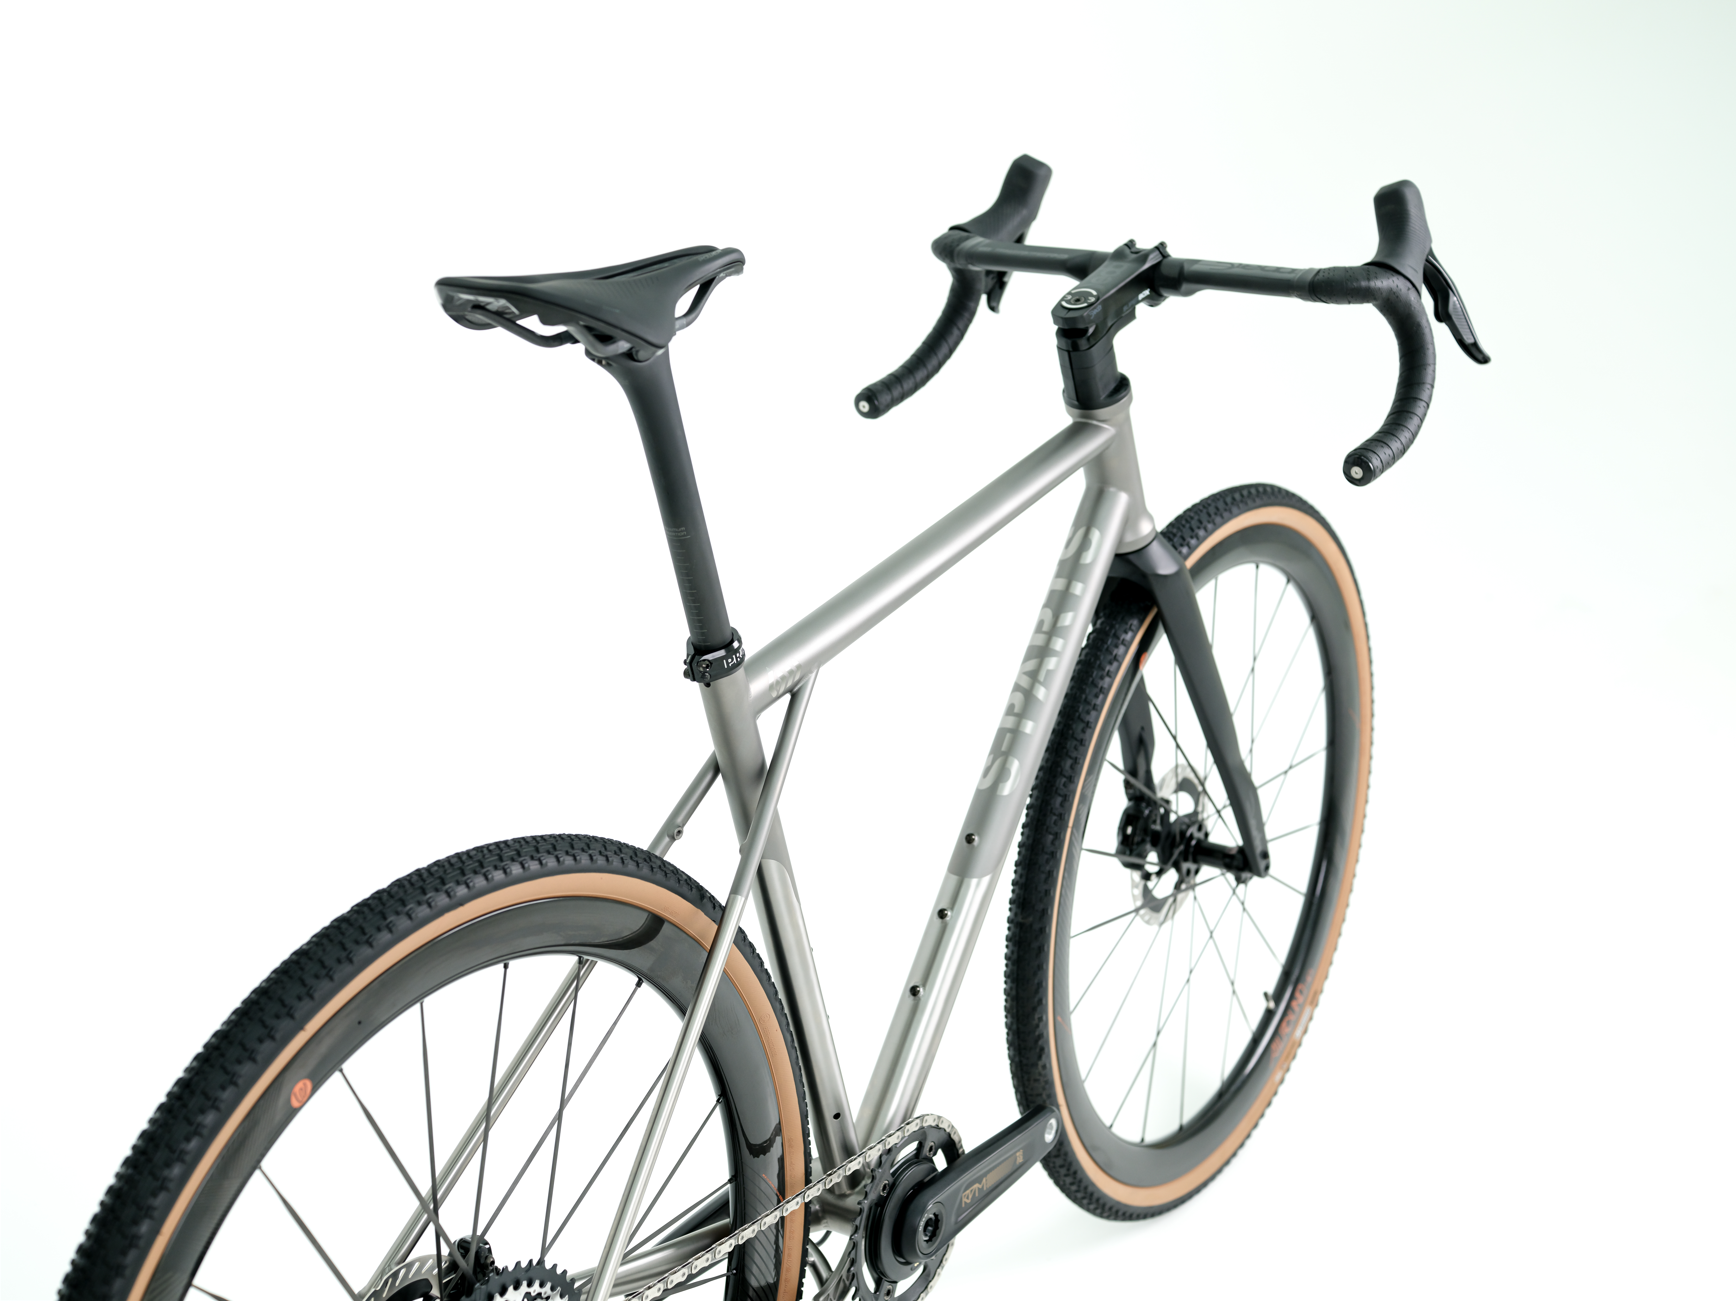
This is the crowning design that we have meticulously developed and finally achieved for mass production. Years ago, when S-PARTS began its custom titanium frame business, we insisted on using a design where the seat stays connect to the top tube, which we termed "CROSS CONTROL" technology. This method effectively uses the passive deformation of metal to absorb road bumps in non-suspension frames. However, due to early technological limitations, we had to conservatively weld the connection between the seat stays and the seat tube. While this ensured the frame's strength, it significantly compromised the original goal of vertical shock absorption, which was undoubtedly frustrating.

For years, this issue has been on our minds, and the S-PARTS team never gave up on finding the optimal solution. In 2023, we introduced new hydraulic bending equipment and internationally advanced calibration and testing instruments. With these resources, we ventured into more daring tube and profile designs, using 3D software to simulate a completely disconnected structure between the seat stays and the seat tube, which we successfully achieved in simulations. This led to the creation of the "CROSS CONTROL 2.0" system we have today.

We chose slimmer seat stays, internally hydroformed to maintain support strength while providing ample clearance. This design allows for controlled physical deformation on rough roads, achieving the intended shock absorption function. To increase the contact area and vertical support strength at the weld points between the stays and the top tube, we used a special vertical pressing mold at both ends of the top tube. This created two elliptical cross-sections—one horizontal at the head tube and one vertical at the seat tube—achieving both aesthetic and functional benefits.
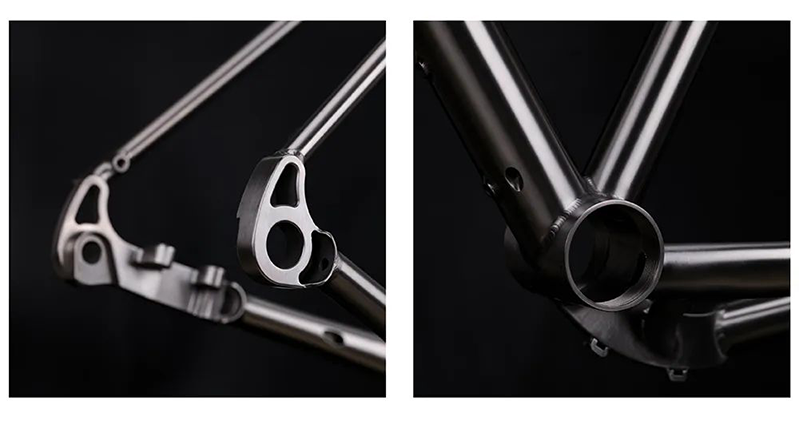
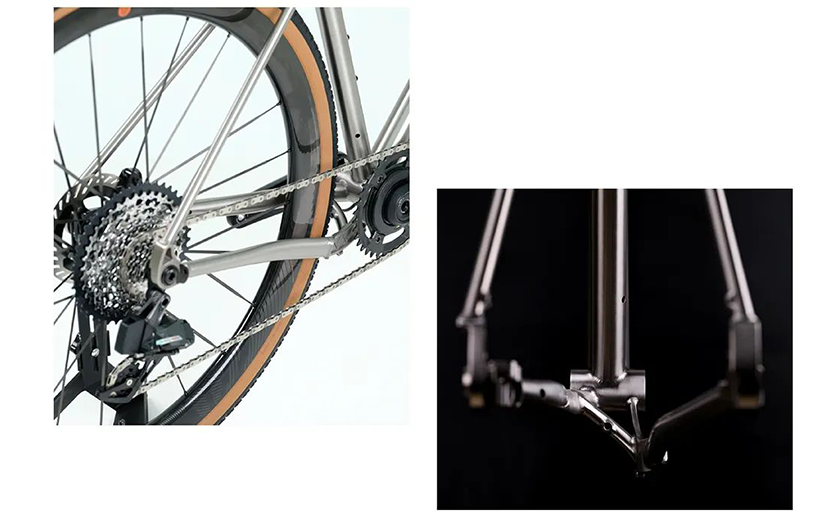
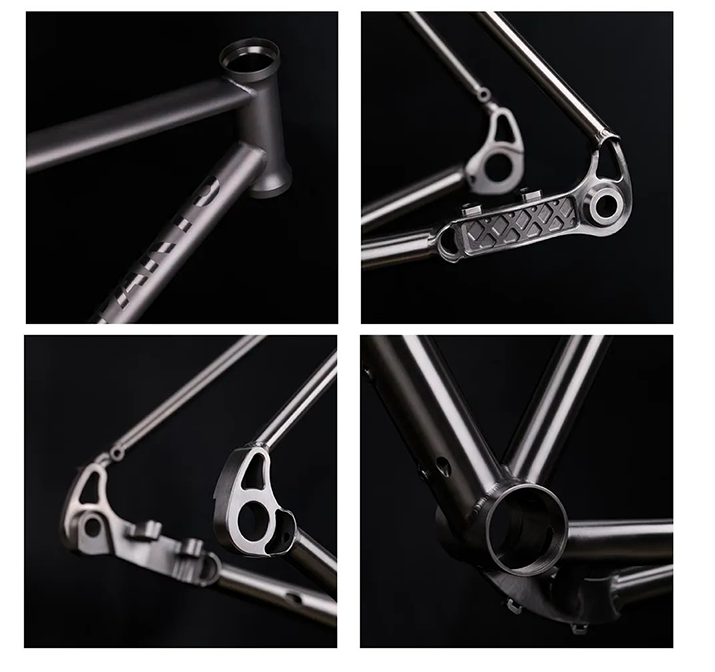
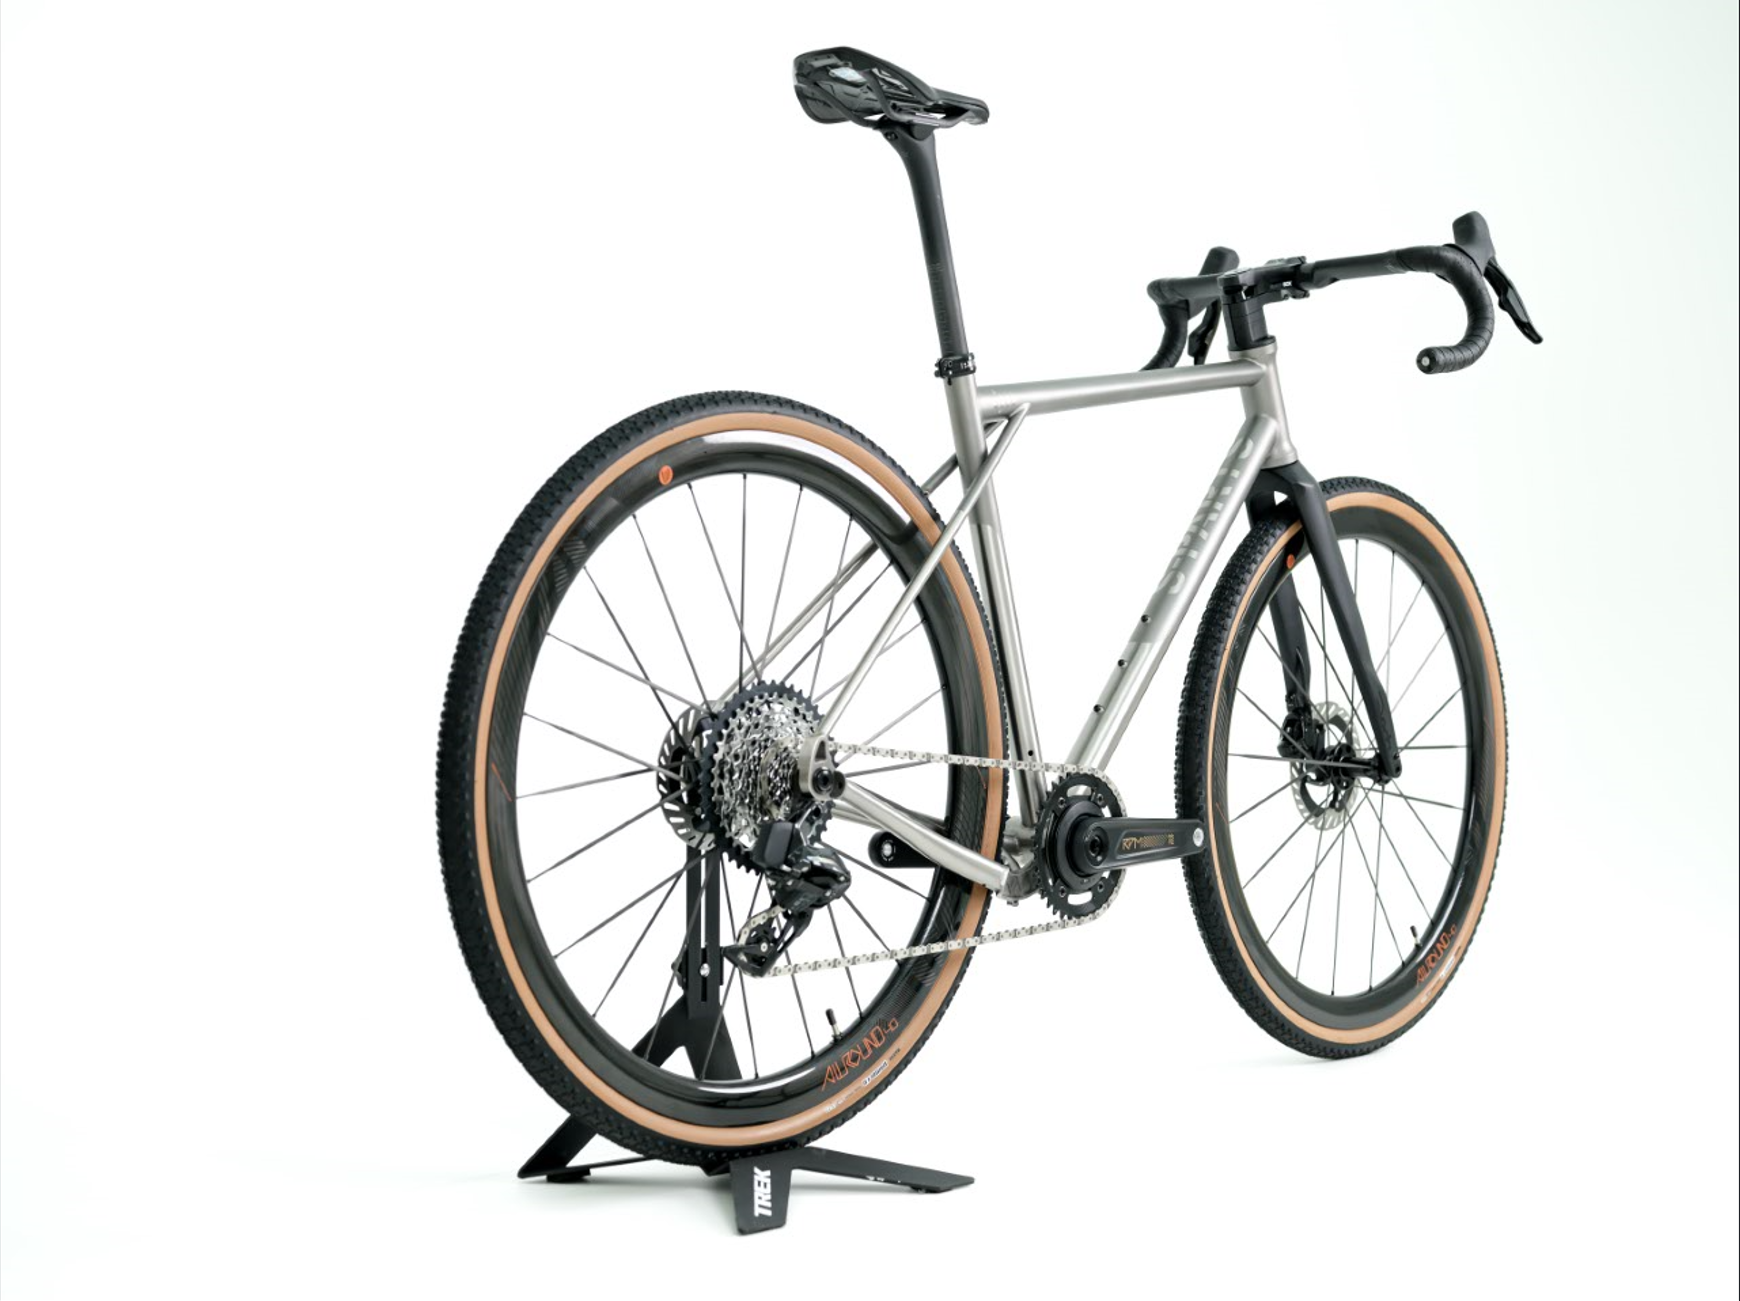
ASYMMETRIC REAR FORK
Traditional metal frames, when requiring compatibility with both large chainrings and wide tires, usually compress the drive-side chainstay to form a dent. This is an unavoidable compromise that inevitably damages the original tube wall structure, resulting in a loss of strength.

S-PARTS designed a connector CNC-carved from a single piece of titanium alloy plate, perfectly solving this issue in multiple ways:
- The solid titanium alloy connector provides higher connection strength than tube materials, ensuring drive-side pedaling rigidity.
- The 6mm wide plate offers considerable installation space for both tires and chainrings, allowing the GRAVEL frame to accommodate tires up to 42c and chainrings up to 48t.
- The asymmetric recessed design also provides more chain movement space, significantly reducing the chance of chain-to-chainstay collisions during extreme bumps.

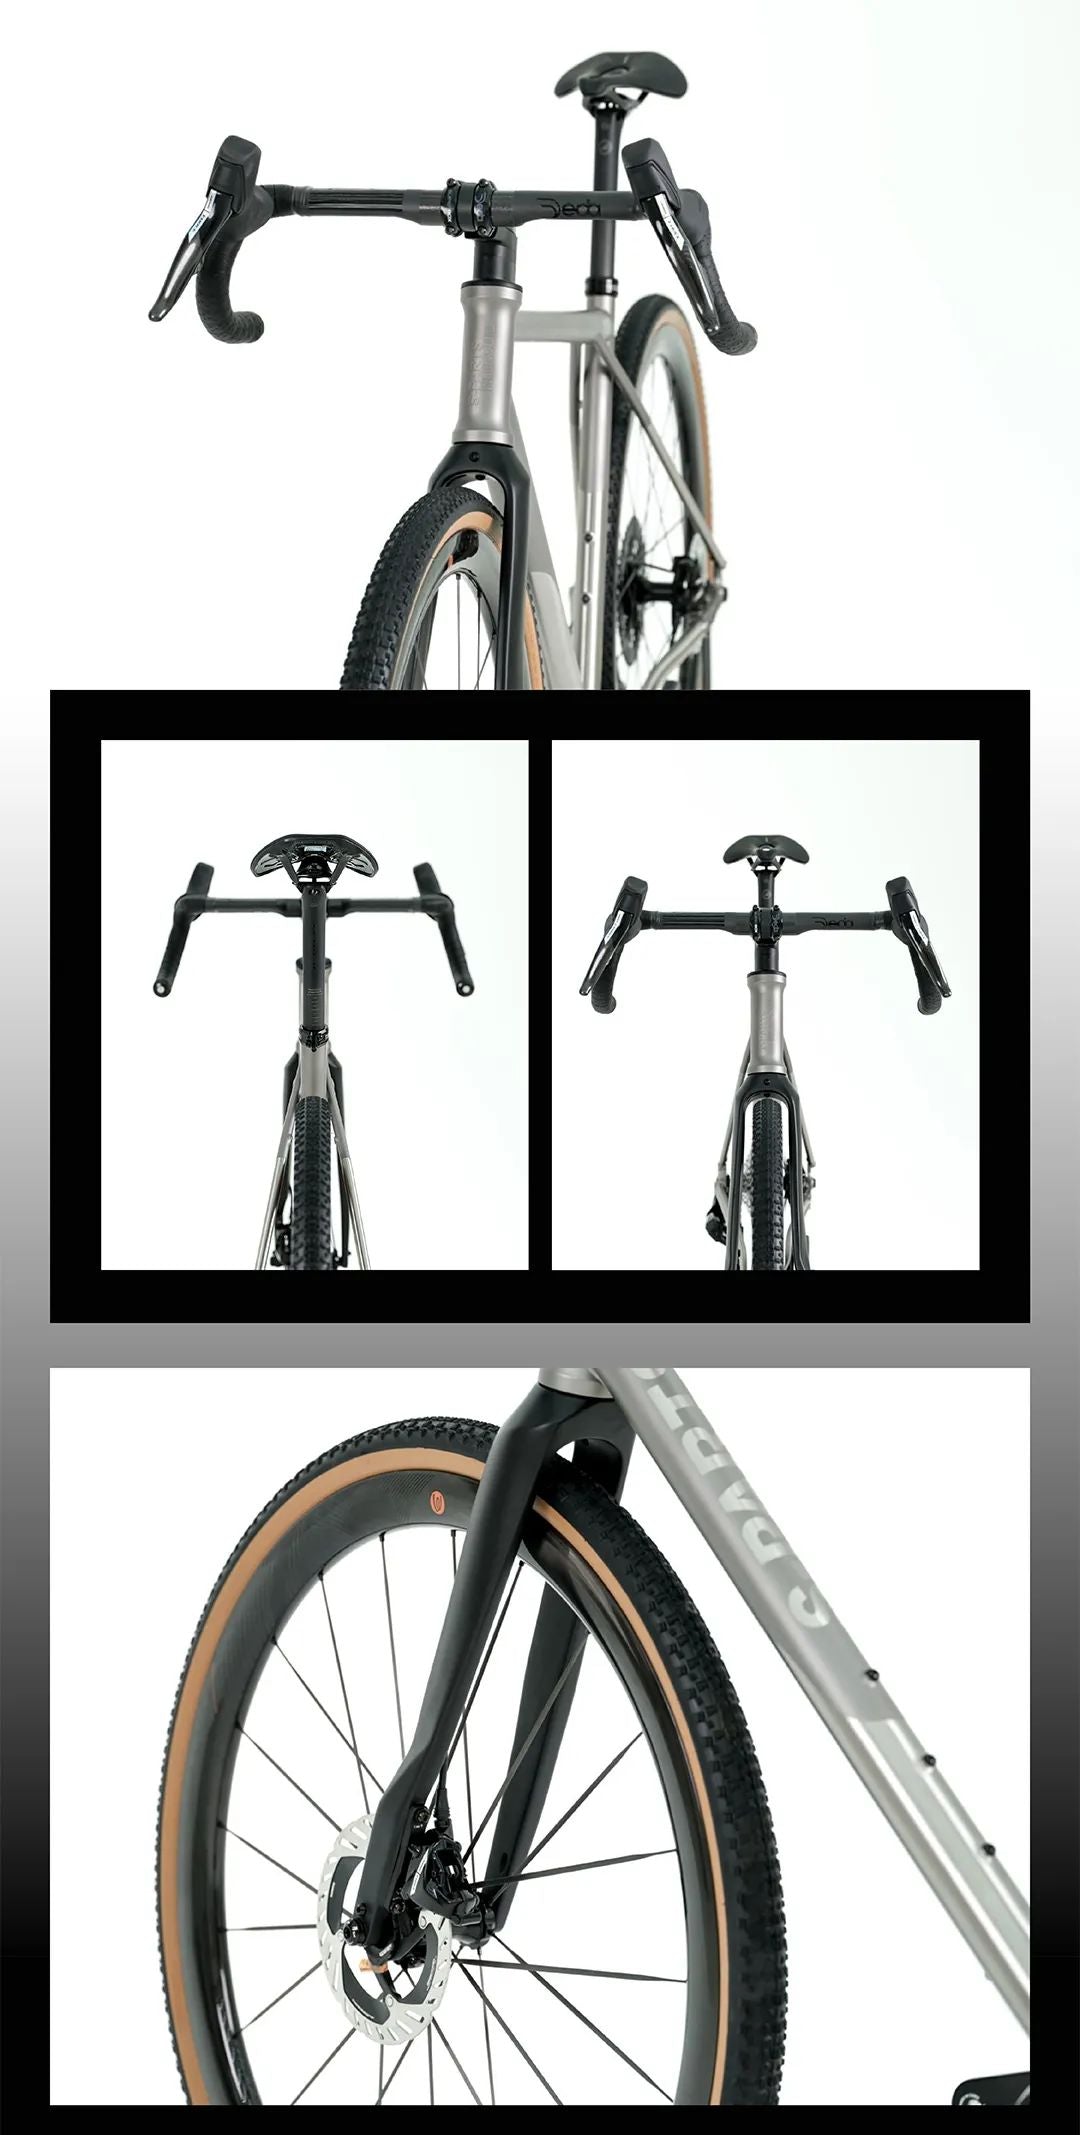
Internal cable routing / CNC rear dropout / UDH derailleur hanger / T47 bottom bracket

The frame features a 52mm integrated headset with uniform diameter, supporting ACR and DCR systems for fully internal cable routing with both integrated and non-integrated handlebars.
The fully CNC-machined flat mount brake caliper installation base ensures high strength and precise mounting holes for quick and accurate setup, delivering sharp and powerful braking performance.
The entire series is equipped with the UDH direct mount dropout system, compatible with nearly all rear derailleurs on the market.
The T47 threaded bottom bracket, standard across the series, is the optimal solution for metal frames, offering excellent stability, pedaling stiffness, and minimal noise risk. For 24mm spindle specifications, it supports a fully hidden brake hose routing solution within the bottom bracket shell.

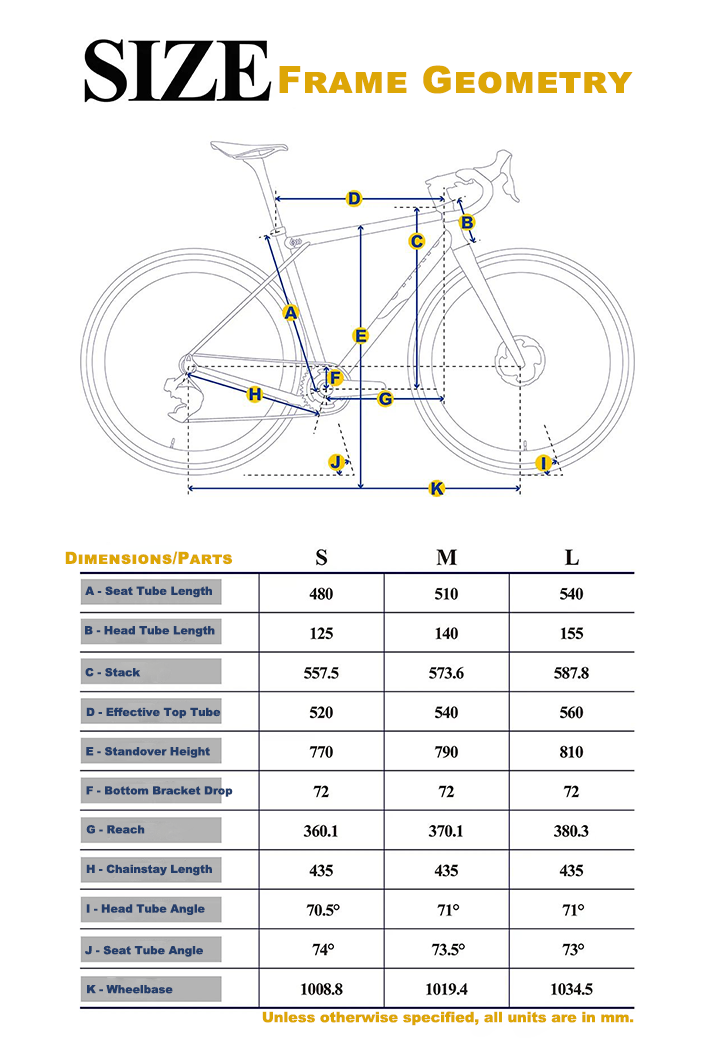
Frame Assembly Guidelines
Head Tube: Use upper and lower 52mm integrated bearing headsets, ensuring compatibility with ACR or DCR system internal cable routing.
Fork: Optimal fork specifications for this frame are a length range of 389-400mm (excluding suspension forks), an offset range of 48-55mm, and a maximum tire clearance >42c.
Bottom Bracket and Crankset: The frame's bottom bracket shell width is 68mm and requires a T47 external bearing bottom bracket. The specific model depends on the crankset used; please consult your retailer or S-PARTS official customer service. The frame supports a maximum chainring size of 48T.
Shifting and Braking: The frame is compatible with DI2, AXS electronic shifting systems, and similar electronic shifting products (not compatible with any mechanical shifting systems). The frame only supports FLATMOUNT disc brake systems.
Seat Post: Only compatible with 27.2mm diameter round seat posts.
Wheelset: Only compatible with 700c wheel specifications and 12mm thru-axle road wheelsets.


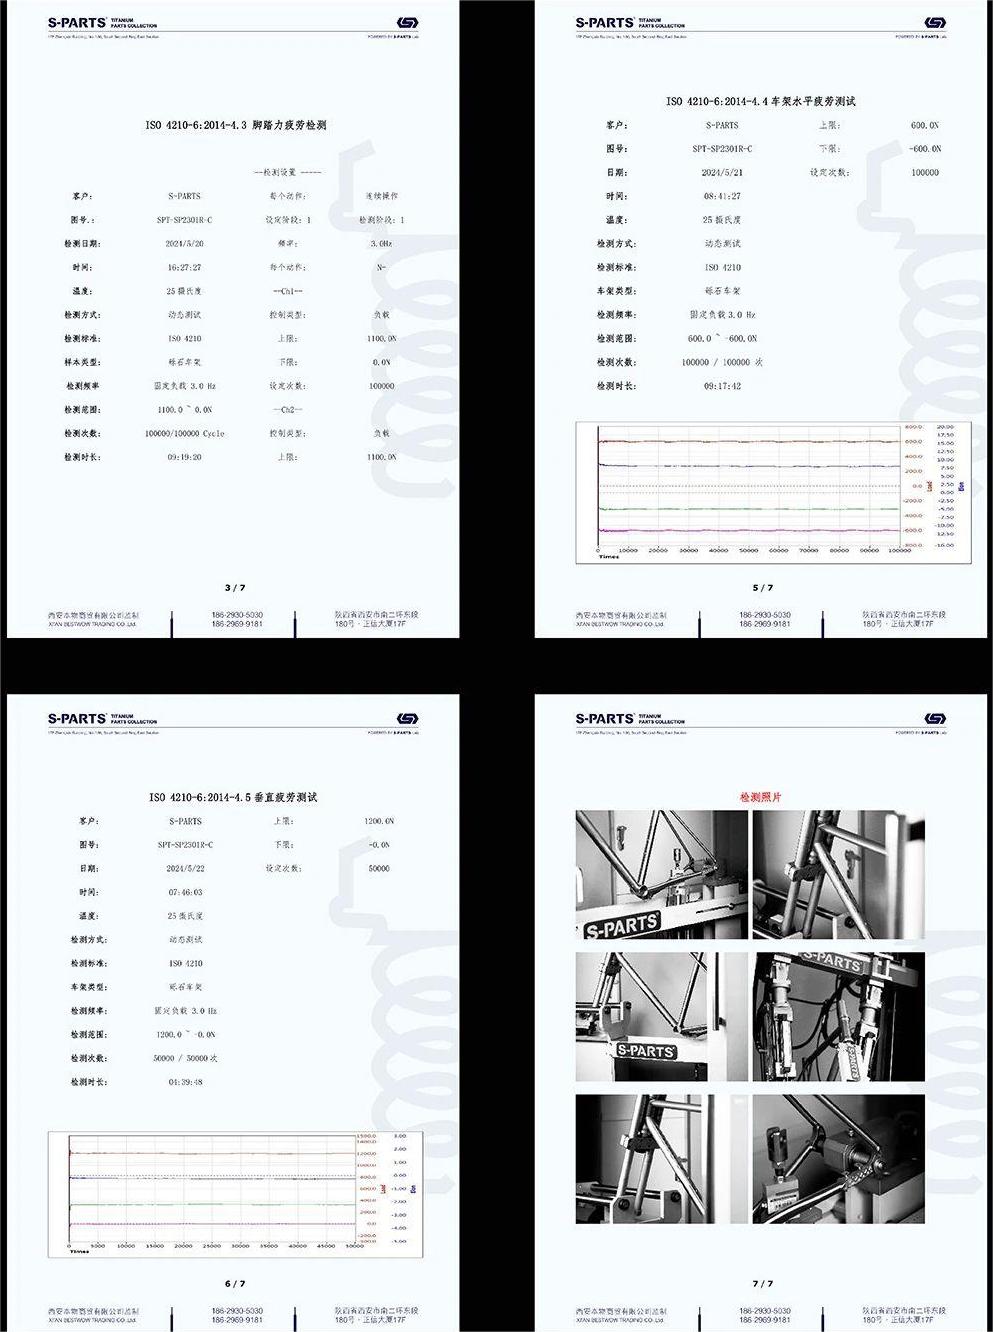
Gravel frame fatigue test report - Chinese

호환성 확인: 원제조업체(OEM) 부품의 모델과 배치가 복잡하기 때문에 이 제품이 호환되지 않는 경우가 있을 수 있습니다.
제품을 받으신 후 설치 전에 OEM 사양과 비교하여 호환성을 확인해 주시기 바랍니다.
토크 사양: 이 제품은 OEM 부품 매뉴얼에 명시된 토크 값에 따라 엄격히 설치하십시오. 설치 문제: OEM 사양과 차이가 있거나 설치 초기 단계에서 어려움이 발생할 경우 즉시 중단하고 반품 또는 교환을 위해 고객 서비스에 문의하십시오.
강제 설치 금지: 어떠한 경우에도 강제로 설치하지 마십시오. 책임: 이 제품(또는 그 부품)의 강제 설치 또는 무단 개조로 인한 모든 손해는 구매자의 단독 책임입니다.
모든 제품은 수령 시 보게 될 색상을 정확하게 표현하기 위해 촬영되었습니다.
조명, 각도 또는 화면 설정의 차이로 인해 약간의 색상 차이가 발생할 수 있습니다.
실제 제품을 기준으로 생각해 주시기 바랍니다. "컬러" 및 "블루" 제품의 경우 염색 과정에서 색상 분포가 고르지 않을 수 있어 각 제품이 독특합니다.
| S-PARTS 자전거 시리즈 공통 토크 참조표 | ||||||
| 성분 | 부품명 | 나사명 | 참조 토크 | 방청제 사용 | 중강도 나사고정제 사용 | 특별 요구 사항 비고 |
| 프레임 시스템 | 핸들바 조립 | M4 스템 고정 나사 | 4NM | 권장 | 주의 고려 | 특수 구조 핸들바 조립품의 경우 원제조사의 권장 토크 사양을 참조하십시오. |
| M5 스템 고정 나사 | 5NM | 권장 | 주의 고려 | |||
| M6 스템 고정 나사 | 6-8NM | 권장 | 주의 고려 | |||
| M7 핸들바 고정 나사 (브롬톤) | 8-10NM | 권장 | 주의 고려 | |||
| M8 스템 고정 나사 (BMX) | 8-10NM | 권장 | 주의 고려 | |||
| 헤드셋 | 헤드셋 프리로드 나사 (M5/M6 포함) | 4-6NM | 권장 | 권장하지 않음 | ||
| 프레임/포크 | M3 포크 호스 클램프 나사 | 1-2NM | 권장 | 권장하지 않음 | 특수 구조 시트포스트 클램프의 경우 원제조사의 권장 토크 사양을 참조하십시오. | |
| 물병 케이지 나사 | 4NMM | 권장 | 권장하지 않음 | |||
| M4 변속기 행거 고정 나사 | 3-4NM | 권장 | 주의 고려 | |||
| M5 변속기 행거 고정 나사 | 4-5NM | 권장 | 주의 고려 | |||
| M5 전후 랙 고정 나사 | 6-7NM | 권장 | 주의 고려 | |||
| M5 시트포스트 클램프 나사 (표준 클램프 디자인) | 6-7NM | 권장 | 권장하지 않음 | |||
| 시트포스트 | M5 안장 레일 클램프 나사 | 6-7NM | 권장 | 권장하지 않음 | ||
| M6 안장 레일 클램프 나사 | 7-9NM | 권장 | 권장하지 않음 | |||
| M7 안장 레일 클램프 나사 | 8-10NM | 권장 | 권장하지 않음 | |||
| M6/M7 단일 볼트 안장 레일 클램프 나사 | 10-12NM | 권장 | 권장하지 않음 | |||
| M8 단일 볼트 안장 레일 클램프 나사 (브롬톤) | 12-14NM | 권장 | 권장하지 않음 | |||
| 휠셋 | M6 퀵 릴리스 휠셋 잠금 나사 | 6-8NM | 권장 | 권장하지 않음 | ||
| M10 BMX 휠셋 잠금 나사 | 권장 | 권장하지 않음 | ||||
| M14 BMX 휠셋 나사 | 권장 | 권장하지 않음 | ||||
| M9 휠셋 잠금 너트 | 12-14NM | 권장 | 권장하지 않음 | |||
| M10 휠셋 잠금 너트 | 14-16NM | 권장 | 권장하지 않음 | |||
| M12 스루 액슬 볼트 | 10-14NM | 권장 | 권장하지 않음 | |||
| M14 스루 액슬 볼트 | 12-16NM | 권장 | 권장하지 않음 | |||
| 브레이크 시스템 | 디스크 로터 | 6볼트 디스크 로터 나사 | 5-7NM | 주의 고려 | 권장 | 브레이크 유압 시스템 관련 나사에는 방청제나 액체 나사고정제를 사용하지 마십시오. 유압 라인 오염을 방지하기 위함입니다. |
| 센터 락 디스크 로터 | 40NM | 권장 | 권장하지 않음 | |||
| 브레이크 레버 | M5 브레이크 레버 고정 나사 | 5-7NM | 권장 | 권장하지 않음 | ||
| M6 브레이크 레버 고정 나사 | 6-8NM | 권장 | 권장하지 않음 | |||
| 로드 바이크 시프터 고정 너트 | 6-8NM | 권장 | 권장하지 않음 | |||
| 브레이크 레버 블리드 포트 나사 | 2-3NM | 권장하지 않음 | 권장 | |||
| 디스크 브레이크 캘리퍼 | M6 산악 자전거 캘리퍼 고정 나사 | 9NM | 주의 고려 | 권장 | ||
| M5 플랫 마운트 캘리퍼 고정 나사 | 7NM | 주의 고려 | 권장하지 않음 | |||
| M8 호스 압착 피팅 나사 | 6-7NM | 권장하지 않음 | 권장하지 않음 | |||
| M6 캘리퍼 본체 나사 | 12NM | 권장하지 않음 | 권장하지 않음 | |||
| M7 캘리퍼 본체 나사 | 14NM | 권장하지 않음 | 권장하지 않음 | |||
| M8 캘리퍼 본체 나사 | 14NM | 권장하지 않음 | 권장하지 않음 | |||
| M6 캘리퍼 밴조 나사 | 12NM | 권장하지 않음 | 권장하지 않음 | |||
| 캘리퍼 블리드 나사 | 5-6NM | 권장하지 않음 | 권장하지 않음 | |||
| 브레이크 패드 핀 | 3NM | 권장하지 않음 | 권장하지 않음 | |||
| C-브레이크 캘리퍼 | 싱글 피벗 캘리퍼 고정 너트 | 8NM | 권장하지 않음 | 권장 | ||
| 듀얼 피벗 캘리퍼 고정 나사 | 6-8NM | 주의 고려 | 주의 고려 | |||
| 브레이크 패드 고정 나사 세트 | 7NM | 주의 고려 | 주의 고려 | |||
| 브레이크 패드 스톱 나사 | 3NM | 권장하지 않음 | 권장하지 않음 | |||
| 캘리퍼 릴리스 레버 나사 | 3NM | 권장하지 않음 | 권장하지 않음 | |||
| 케이블 앵커 나사 | 5-7NM | 권장 | 권장하지 않음 | |||
| 드라이브트레인 시스템 | 시프터 | 시프터 클램프 볼트 | 4-6NM | 권장 | 권장하지 않음 | 브레이크 유압 시스템 관련 나사에는 방청제나 액체 나사고정제를 사용하지 마십시오. 유압 라인 오염을 방지하기 위함입니다. |
| 시프터 통합 볼트 | 4-6NM | 권장 | 권장하지 않음 | |||
| 시프터 탑 캡 볼트 (시마노) | 4NM | 권장 | 권장하지 않음 | |||
| 프론트 변속기 | 직접 장착 프론트 변속기 고정 볼트 | 6-7NM | 권장 | 권장하지 않음 | ||
| 프론트 변속기 클램프 볼트 | 5-7NM | 권장 | 권장하지 않음 | |||
| 프론트 변속기 케이블 조절 볼트 | 5-7NM | 권장 | 권장하지 않음 | |||
| 리어 변속기 | 리어 변속기 피벗 | 10-12NM | 권장 | 권장하지 않음 | ||
| UDH 시스템 리어 변속기 피벗 | 25NM | 권장 | 권장하지 않음 | |||
| M4 풀리 볼트 | 3NM | 주의 고려 | 주의 고려 | |||
| M5 풀리 볼트 | 4NM | 주의 고려 | 주의 고려 | |||
| M3 리어 변속기 잠금 커버 볼트 (시마노) | 1.5NM | 권장하지 않음 | 권장하지 않음 | |||
| 리어 변속기 케이블 조절 볼트 | 5-7NM | 권장 | 권장하지 않음 | |||
| 크랭크셋 | 체인링 양면 볼트 | 6-8NM | 주의 고려 | 주의 고려 | ||
| 싱글 체인링 볼트 | 8NM | 주의 고려 | 주의 고려 | |||
| M5 크랭크 암 볼트 (SRAM 3볼트) | 7NM | 주의 고려 | 주의 고려 | |||
| M4 크랭크 암 볼트 (SRAM 8볼트) | 4-5NM | 주의 고려 | 주의 고려 | |||
| M6 크랭크 암 고정 볼트 (시마노) | 12-14NM | 주의 고려 | 주의 고려 | |||
| 크랭크 암 캡 (시마노) | 2-4NM | 권장하지 않음 | 권장하지 않음 | |||
| 크랭크 암 고정 볼트 (DUB) | 54NM | 권장 | 권장하지 않음 | |||
| 크랭크 암 고정 볼트 (로터) | 30-35NM | 권장 | 권장하지 않음 | |||
| 크랭크 암 고정 볼트 (EE) | 52NM | 권장 | 권장하지 않음 | |||
| M8 스퀘어 테이퍼 크랭크 볼트 | 30NM | 권장 | 권장하지 않음 | |||
| 페달 | 페달 축 | 25NM | 권장 | 권장하지 않음 | ||
| 로드 클릿 고정 볼트 (3볼트) | 6-8NM | 권장하지 않음 | 권장 | |||
| MTB 클릿 고정 볼트 (2볼트) | 8NM | 권장하지 않음 | 권장 | |||